Hitching Up...Like a Pro!
There is a specific kind of freedom that comes with a trailer in tow; whether you’re hauling gear for a weekend getaway or moving heavy equipment for a job. But before you hit the open road, the most critical step happens in your driveway: the hitch-up.
Doing it right doesn't just protect your equipment; it ensures the safety of everyone on the road. Here at Hitch Haul, we believe a smooth ride starts with a secure connection. Follow these best practices to master the art of the hitch.
1. The Pre-Flight Check: Know Your Limits
Before you even back up the truck, you need to speak the language of weight. Exceeding your vehicle’s capacity is a recipe for transmission failure or, worse, a loss of steering control.
Gross Trailer Weight (GTW): The total weight of the trailer plus its cargo.
Tongue Weight: The downward force exerted on the hitch ball (ideally 10-15% of the GTW).
Check the Specs: Ensure your hitch, ball mount, and hitch ball are all rated for the weight you’re pulling. Remember: your setup is only as strong as its weakest link.
2. Precision Alignment
Backing up to a trailer is an art form. If you don’t have a backup camera, a spotter is your best friend.
The Approach: Line up your vehicle so the hitch ball is directly under the trailer coupler.
The Drop: Crank the trailer jack to lower the coupler onto the ball. You should hear a distinct "thud" or feel the weight settle.
The Lock: Close the latch and secure it with a safety pin or lock. If the latch doesn't close completely, your ball might be the wrong size or the coupler isn't seated properly.
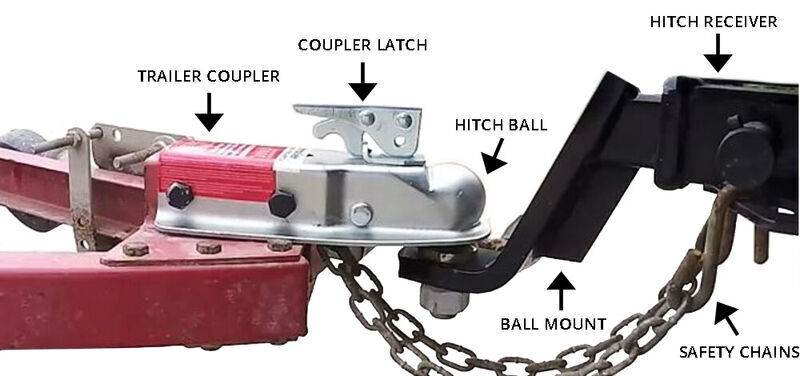
3. Safety Chains: Your "Plan B"
Safety chains aren't just a legal requirement; they are your fail-safe.
The "X" Pattern: Always cross your chains underneath the trailer tongue. This creates a "cradle" that will catch the tongue if the coupler ever disconnects from the ball.
Slack Check: Ensure there is enough slack for sharp turns, but not so much that the chains drag on the pavement.
4. Power Up the Lights
Visibility is non-negotiable. Plug in your 4-way or 7-way wiring harness and perform a "walk-around" check.
Pro Tip: Have a partner stand behind the trailer while you test the left turn signal, right turn signal, brake lights, and running lights. If you're solo, use the reflection in a garage door or window!
The Hitch-Up Checklist
| Step | Action | Status |
| Coupler | Seated on ball and latched tight | [ ] |
| Pin | Safety pin/lock inserted in latch | [ ] |
| Chains | Crossed in an "X" with proper slack | [ ] |
| Wiring | Plugged in and lights tested | [ ] |
| Jack | Fully retracted and stowed | [ ] |
5. The "Tug Test"
Before you pull out onto a main road, perform a tug test. Shift your vehicle into gear and tap the manual override on your brake controller (if equipped) or give it a very gentle crawl forward. You want to feel the trailer's weight engaging smoothly without any rattling or shifting.
Happy Hauling! By taking these extra five minutes, you’re ensuring a stress-free journey for yourself and your cargo.